Thursday, May 29, 2008

Application Deployment on EC2 made easier using Smart EC2 Tool

Those who have worked on EC2 must be familiar with the deployment issues, due to the dynamic nature of the EC2 environment. Since we have been working with EC2 for a long time, we have come up with a tool to manage our application deployment using ANT(ANT is a build tool hosted in APACHE projects) and we are sure that the rest of the world can also use it.

This tool is generic enough to be used in a non EC2 environment, but in this article, we focus only on EC2.

About SmartEC2 Tool

This tool has bunch of ant tasks which can be used in the EC2 environment.

BaseTask - This is the base for all the other tasks. Has a method to save files to a given location.

S3Download - Helps to download objects from S3 buckets. This tool uses Jets3t for this task.

HttpDownload - Simple HTTP file download task. It does not support HTTPS and HTTP based authentication. Used only for public URL's.

MetadataDownload - This downloads all metadata related to the instance and stores it as a property file in the given location. EC2 Meta data is available as a tree structure. This task downloads all the metadata in one short and makes it available as a linear property file.

A typical EC2 Metadata request would provide the following list.
ami-id
ami-launch-index
ami-manifest-path
block-device-mapping/
hostname
instance-id
instance-type
local-hostname
local-ipv4
placement/
public-hostname
public-ipv4
public-keys/
reservation-id
security-groups


The translated Metadata file contains data in the following fashion.


ami-id = ami-sdfes213
ami-launch-index = 0
ami-manifest-path = ?
block-device-mapping/0 = ?
block-device-mapping/1 = ?
hostname = ec2-67-202-43-212.compute-1.amazonaws.com
instance-id = i-qwewq132
instance-type = ?
local-hostname = ec2-67-202-43-212.compute-1.local
local-ipv4 = ?
public-hostname = ?
public-ipv4 = ?
public-keys/0 = sdfdsfsd-sdfsdf34543-#
reservation-id = ?


ReplaceProperty - This task helps you to replace any properties in the corresponding target file. At this point it can replace any one of the properties at a time.

Smart EC2 tool contains all of the tasks listed above and a default build.xml file.


<?xml version="1.0" encoding="UTF-8"?>

<project name="Ec2Ant" basedir="." default="execBuild">

<property name="localFolder" value="${basedir}"/>

<property name="s3buildPath" value="${localFolder}/s3build"/>

<property environment="env"/>

<path id="csslab.lib">

<fileset dir="lib">

<include name="**/*.jar"/>

</fileset>

</path>

<typedef name="s3download" classname="com.csslab.s3ant.s3.S3Download" classpathref="csslab.lib"/>

<typedef name="HttpDownload" classname="com.csslab.s3ant.core.HttpDownload" classpathref="csslab.lib"/>

<typedef name="ec2metadata" classname="com.csslab.ec2.MetadataDownload" classpathref="csslab.lib"/>

<typedef name="replaceproperty" classname="com.csslab.ec2.ReplaceProperty" classpathref="csslab.lib"/>

<target name="execBuild">

<mkdir dir="${s3buildPath}"/>

<echo>Using build path ${s3buildPath}</echo>

<HttpDownload fileUrl="http://169.254.169.254/1.0/user-data" localFolder="${s3buildPath}"/> <loadproperties srcFile="${s3buildPath}/user-data"/>

<s3download accessKey="${accessKey}" secretKey="${secretKey}" bucketName="${bucketName}" S3ObjectPath="${buildFile}" localFolder="${s3buildPath}" saveFileAs="build.xml"/><ant antfile="${s3buildPath}/build.xml" dir="${s3buildPath}" inheritrefs="true"/>

<delete dir="${s3buildPath}"/>

<echo>Build completed successfully.</echo>

</target>

</project>


First section contains declaration for some of the properties used by the targets.
Next you will find the definition for all the four ant tasks.
Then you will see a target that gets executed when the ANT starts.

Deploying Smart EC2 on your AMI
Pre-requisite
Please download the following pre-requisites.
  • JDK 1.5 or later from Sun
  • Ant 1.7 from Apache
  • Download Smart EC2 from here (http://smartec2.s3.amazonaws.com/SmartEC2.zip). Unzip the file and you will find a lib folder and a build.xml file.
  • Setup your path to point to the Java and ANT binaries.

    How does it work?
    EC2 has a provision to launch AMI's by providing user-defined data as an input file. The build process expects certain important parameters like Access Key, Secure Key, build file path and bucket name where the build file is available. The user defined data should be in the below given format. The key names listed below are mandatory. But you are free to add your own keys for further build process.


    accessKey={your access Key}
    secretKey={your secret key}
    bucketName={your bucket name}
    buildFile={your build file path}


    A typical user-defined data file looks like the below one.

    accessKey=aaaaa2323123bcv
    secretKey=sce3434343#$$$$vvxcvx/sdfsdfs
    bucketName=mybucket
    buildFile=mybuild.xml


    Download the sample user data file here and store it locally. But you need to replace properties with the appropriate values.
    You can use putty to login to the instance once it is launched and change your directory to where you have installed Smart EC2. For the first time users, you need to install the tool and bundle your AMI. If you are not familiar with building AMI’s , you can use our Jboss AMI which is available for public. Please find the URL below.
    http://developer.amazonwebservices.com/connect/entry.jspa?externalID=1450
    Let’s assume you have installed Smart EC2 under /var/local. This is where the tool is installed on the above mentioned AMI.
    You will use the following command to go to the tools home.
    Cd /var/local/SmartEC2
    Execute the command ant.
    This will download the user defined data from the EC2 server and make it available as ANT properties. And then it will download the build file created by you for your project and executes it.

    How can you benefit out of this?
    As we know ant has a wide variety of tasks which can ease your deployment process such as executing shell scripts, deploying war, ear files on to the container etc. So sky is the limit.
    We have created couple of sample build files(Sample1 , Sample2) in our S3 bucket for your reference as well.
    Subscribe to this user group to get more updates.
    You can download the source and build on top of it.

    For your convenience we have created a step by step screen shots to showcase as how we deploy our applications using this solution.


    SmartEC2 Tool Deployment

    Step-by-Step Process


    Step 1:


    Step 2:


    Step 3:


    Step 4:


    Step 5:


    Step 6:

    Step 7:

    Step 8:

    Sunday, May 11, 2008

    Our experience with AWS

    We have been working with Amazon Web Services for the last couple of months for various things and thouhgt of sharing our key findings with you all.

    First of all, I would like to thank Amazon for providing such a great experience to us , a simple webservice call , an instance of a computer up and running. When we started our exploration, we got an account with Amazon and working with S3 for quite some time. It is an another service for storage and works well for its cause.

    Then we decided to explore EC2 and started browsing various AMI's (Amazon Machine Image) that are available. First we tried with Fedora Core 4 and we could successfully load that AMI into an instance. also, allowed SSH and Web server port to be available for public access.

    After following the procedures for setting up Putty given by AWS , we tried accessing our instance using Putty. We could connect but we were not able to use the instance due to frequent disconnection. After all our effort it went on drain.


    Then stopped exploring AMI's for a week time and started reading the available articles. Even after going through bunch of documents , we couldn't really figure out why there was a disconnection?

    Again we got charged and wanted to try a different AMI, by then we got an information in AWS forum about a stable Ubuntu release (Thanks to Eric) and tried it. This time it was great success, it worked as it is expected and never faced any disconnection.

    Once we are done with our initial setup, we wanted to go further and create our own AMI for Jboss. Because at that time we couldn't really find any compeling AMI with bare minimum Ubuntu.

    When we started the AMI intially we were fine with Ubuntu as a bare minimum OS and it worked perfectly fine, but then we were finding difficulties to download files, browsing a webse site using a text based web browser..etc. So we had to use apt-get to download lynx and install it. As soon as we got the lynx, started downloading the following necessary softwares for our Jboss AMI.
    1. Java 1.6 - SDK and runtime requires to run any java applications.

    2. Jboss 4.2 As - J2EE application server, requires to run any Java 2 Enterprise
      applications.

    3. Apache 2.4 - Web server require to front end any request with realted to web and
      webservices.

    4. S3Cmd - This tool is used to perform S3 related operations using command line.

    Setting up apache 2.4 is an interesting story, we have download Httpd from apache webiste and tried configuring it. The configure command was complaining about the non availability of the gcc compiler. Then we had to install gcc and gcc-lib using the command apt-get command.

    Then our installation went fine and successfully setup Apache 2.4. After that installed Java 1.6 and Jboss 4.2 AS. There was no problem setting up both of them.

    The mod_jk connector for apache was downloaded and setup the workers.properties to connect Apache and Tomcat.

    After all these setup we were able to see our Jboss home. and we thought it will be a good AMI to share and applied with Amazon. Hopefully you will have this in your hand soon.


    Thursday, May 8, 2008

    iPhone SDK Installation

    Since we are new to MAC, We have had a very tough time to setup the iphone SDK on our Intel based MAC machine. It is always a best practice to share what you have learnt. Hence this article has born.

    The Fourth beta version of the iPhone SDK includes Xcode IDE, iPhone simulator with Open GL ES support, Interface Builder, Instruments, frameworks and samples. The file size of the SDK around 1.37 GB. iPhone SDK will run on Intel-based Macs running Mac OS X v10.5.2 and later. We have given the step by step installation for the newbies.


    Step-by-Step Installation


    Pre-Requisite


    Make Sure that you have installed the iTunes 7.6.1 before installing the iPhone SDK,if fails the Xcode IDE (used to developing the application for iPhone or iPod) will crash.


    1. Download the iPhone SDK from the following URL : http://developer.apple.com/iphone/sdk1

    Before download the file,it will ask your own Apple ID. If you don't have the Apple ID,just click the “Create Apple ID” button and fill your details in the form.


    Apple will send an email to your ID which is given by you during the registration. They send a confirmation mail and also give the link for downloading the SDK.


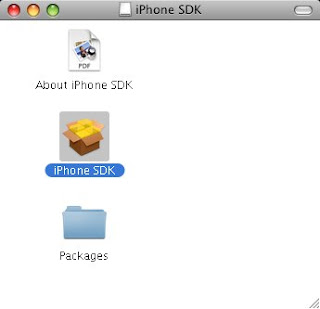
    2. After downloading the SDK (.dmg extension), double click on the file and it will shown the window like this

    select iPhone SDK icon and double click on it.


    In iPhone SDK Bundle, you can select required tools using “Custom Install” as shown in below figure.

    To change the installation location for installing the SDK or install in the default location. The default installation location is /Developer.


    During the installation, it will require the Mac user name and password,


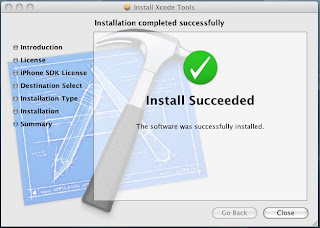
    After validating the user name and password, the installation will start and the installation window looks like this


    Once you have proceed the SDK setup without any interrupts, the SDK installation will succeed.

    Installation Tools


    iPhone Simulator

    • The Simulator is known to fail when run by a user other than the user account under which the iPhone SDK was installed
    • Resetting the Simulator using the on-device Settings app by clicking
    • Settings > General > Reset will leave the Simulator "stuck"
    • The version of the Foundation framework included in the Simulator includes functionality not found on the iPhone or iPod touch.

    Xcode IDE

    Xcode IDE, a graphical workbench that tightly integrates a professional text editor, a robust build system, a debugger, and the powerful GCC compiler capable of targeting Intel and PowerPC regardless of host platform. Xcode is both easy to use, and yet powerful enough to build the largest Mac OS X applications. The complete Mac OS X developer tools chain is distributed as part of Xcode; these tools include Interface Builder, Instruments, Dashcode, and the WebObjects framework.


    Interface Builder

    Interface Builder is an application for designing and testing user interfaces. Developers can use Interface Builder to create user interfaces that follow the Mac OS X human-interface guidelines by dragging user-interface elements from a palette of predefined controls and dropping them into the window or view they are configuring. Interface Builder works closely with Xcode to provide a development experience that facilitates the concurrent but specialized development of an application's user interface and business logic.


    Interface Builder is Apple's graphical editor for designing user interface components for both Carbon and Cocoa applications. Interface Builder makes creating an application's user interface easier by allowing developers to use its graphical editing environment to manage virtually every aspect of creating a well designed user interface that adheres to the Aqua user interface guidelines.

    Issues

    Code Signing

    Code signing is enforced on the device starting with beta 4 of the iPhone SDK and iPhone OS. This means that your project will need to contain a valid certificate signing identity that resolves to a valid certificate in your keychain. If there is no valid identity in the project, the code will continue to function on the Simulator, but will fail to execute on any device.


    Xcode and developer tools


    The iPhone SDK is designed for Intel-based Macs in 32-bit mode; many features will not work on PPC-based Macs or in Intel 64-bit mode

    Interface Builder

    Not all Cocoa Touch views and controls are supported yet


    iPhone SDK

    The iPhone SDK was officially announced on March 6, 2008, at an Apple Town Hall meeting.

    • The first Beta release of the SDK was made available immediately, while the launch of applications will require waiting until a firmware update in June, 2008. This update will be free for iPhone users, however, there will be a charge for iPod touch owners
    • On March 27, 2008, Apple released the Beta 2 release of the SDK, which added Interface Builder, an application for building graphical user interfaces for iPhone applications
    • On April 8, 2008, Apple released the Beta 3 update to the SDK
    • On April 23, 2008, Apple released the Beta 4 SDK includes Xcode IDE, iPhone simulator with Open GL ES support, Interface Builder, Instruments, frameworks and samples, compilers, and Shark analysis tool
    • Apple has released iPhone SDK Beta 5. According to Apple the release is centered on bug fixes and support for the latest iPhone OS


    iPhone OS


      iPhone OS is derived from Mac OS X,which based on the Mach Kernel and Darwin core as Mac OS X.


    Mac OS X Architecture


    Kernel Environment:


       The Mac OS X kernel environment includes the 


    • Mach kernel
    • BSD
    • I/O Kit
    • File systems 
    • Networking components.


    These are often referred to collectively as the kernel.

    The BSD layer is based on the BSD kernel, primarily FreeBSD. The BSD component provides


    • file systems
    • networking (except for the hardware device level)
    • UNIX security model
    • syscall support
    • the BSD process model, including process IDs and signals
    • FreeBSD kernel APIs
    • many of the POSIX APIs
    • kernel support for pthreads (POSIX threads)


    For more details about Kernel architecture,please visit the following link

    http://developer.apple.com/documentation/Darwin/Conceptual/KernelProgramming/Architecture/chapter_3_section_1.html#//apple_ref/doc/uid/TP30000905-CH1g-DontLinkElementID_6


    SDK Contents 

    The iPhone SDK broken down into four layers.

    1. Core OS
    2. Core Services
    3. Media
    4. Cocoa Touch

    Core OS

    iPhone SDK OS,basically derived with Mac OS X.


    Core Services

    The Core Services layer contains the contact address book,networking basically supports both IP and DDP (AppleTalk transport),multicast support,server tuning,packet filtering etc.


    SQLite is a mostly ACID-compliant relational database management system contained in a relatively small (~500kb) C programming library. A standalone program called sqlite3 is provided which can be used to create a database, define tables within it, insert and change rows, run queries and manage an SQLite database file. This program is a single executable file on the host machine. It also serves as an example for writing applications that use the SQLite library.


    Media

    The Audio and video features are embedded in the iPhone. OpenAL (Open Audio Library) is a free software cross-platform audio API. It is designed for efficient rendering of multichannel three dimensional positional audio. Its API style and conventions deliberately resemble that of OpenGL.


    Image file formats such as JPG,PNG and TIFF are supported. PDF documents also can be read through iPhone.


    Quartz 2D is the primary two-dimensional (2D) text and graphics rendering library: It directly supports Aqua by displaying two-dimensional graphics to create the user interface, including on-the-fly rendering and anti-aliasing.


    Core Animation provides a way for developers to produce animated user interfaces via an implicit animation model. The developer specifies the original and final states of an object, and Core Animation handles interpolation. This allows animated interfaces to be created with relative ease, as no specific code for the animation is required by the developer.

    OpenGL (Open Graphics Library) is a standard specification defining a cross-language cross-platform API for writing applications that produce 2D and 3D computer graphics. The interface consists of over 250 different function calls which can be used to draw complex three-dimensional scenes from simple primitives.


    Cocoa Touch

    Cocoa Touch provides an abstraction layer of the iPhone OS, which is the operating system for the iPhone and iPod touch. Cocoa Touch is based on the Cocoa API toolset for building software programs for Mac computers.


    Cocoa (API)

    Cocoa applications are typically developed using the development tools provided by Apple, specifically Xcode (formerly Project Builder) and Interface Builder, using the Objective-C language.

    Cocoa applications worked on keyboard and mouse basis. Cocoa is enhancement especially for iPhone environment (Touch Screen).


    Multi-touch is a human-computer interaction technique and the hardware devices that implement it, which allow users to compute without conventional input devices (i.e., mouse, keyboard). Multi-touch consists of a touch screen (screen, table, wall, etc.) or touchpad, as well as software that recognizes multiple simultaneous touch points, as opposed to the standard touch screen (i.e. computer touchpad, ATM), which recognizes only one touch point.

    Accelerometer is a device for measuring the acceleration and gravity induced reaction forces it experiences. Single- and multi-axis models are available to detect magnitude and direction of the acceleration as a vector quantity.

    Accelerometers are increasingly being incorporated into personal electronic devices such as media players, gaming devices, or step counters. Smartphones and personal digital assistants (such as Apple's iPhone and iPod Touch and the Nokia N95) contain accelerometers for user interface control, e.g., switching between portrait and landscape modes.

    People Picker allows iPhone applications to access the iPhone's Address Book, while Picture Picker opens up access to the iPhone's Photo Library and Camera.


    Application Deployment in Device

    Once the application is developed, UI designed, and platform tested in the virtual iPhone Simulator environment, developers will be able to debug their application with Remote Debugger. The Remote Debugger allows the developer to connect their iPhone to their computer, run the newly minted application, and monitor in real-time the iPhone's CPU usage, memory usage, and frame rates - giving the developer greater insight into the application's impact on the iPhone.

    Syncing an application to your iPhone through the 30-pin iPhone dock connector. This allows you to do live debugs on your code, while using the application on it's native hardware. We must pay the $99 (standard) or $299 (enterprise) in order to transfer an application to an iPhone for testing. You use the certificate to sign your code.